Friday, December 26, 2008

How to disable SuperFetch on Vista

As everyone is aware SuperFetch pre-loads your system's memory so that your frequently used programs can be accessed faster when you want to use it. However, for gamers especially online gamers, this feature might slow down the PCs and cause an unwanted behaviour when they are playing the game.

Thanks to Windows who still provide a way for the SuperFetch to be disable so that you(especially gamers) can enjoy your games without being annoyed when the games keep lagging as the RAM space for the game is consumed by the SuperFetch. For those of you who only use the computer witout using so much RAM, I will not encourage you to disable the SuperFetch feature.

Here is a step by step on how to disable the SuperFetch feature:
  • Open up the Services in the Control Panel by choosing from the Administrative Tools or by typing Services.msc at the Start search panel.
  • Then, you should search for the SuperFetch services and double click on it to open up its Properties window.
  • After that you can change at the drop down menu to disabled the SuperFetch.

I hope that this article would be informative you. So good luck! Try it yourself. See how it can change your PCs.

*It might differ from one computer to the other.

How to get Windows SuperFetch on XP

In my article Windows SuperFetch: Another amazing feature of Vista I have yet to tell you that the Windows SuperFetch can also be a feature in XP. While it is not really a needs to have the SuperFetch in XP as it runs fine on a small amount of RAM anyway. But whats wrong for adding some more speed to your PCs. Moreover, it doesn't cost you any hardware changes or upgrades. This is something I've picked up when I was surfing the Internet. You can also try this eBoostr software.

Tuesday, December 23, 2008

How to Configure Command Prompt to Always Run as Administrator

I've posted an article on solving one of the command prompt error which is solved simply by running it as an Administrator, if have not check it out follow this link. OK, the article before talked about how to run your command prompt as an Administrator manually, by running it as Administrator users are able to use every command there is.

This article will show you how to configure your command prompt to always run it as an Administrator. Below is a step-by step on how to configure it:
  1. Click Start >> All Programs >> Accessories>> Right-Click on Command Prompt and choose Properties

  2. Click on Advanced

  3. Check the Run As Administrator checkbox >> OK >> OK

Now you can run the command prompt without going through the tiresome step of running it through the Accessories any longer.

Windows SuperFetch: Another amazing feature of Vista

SuperFetch is another mechanism in Vista that reduce the time required to launch popular applications effectively and much faster than they would on Windows XP-based PCs. It analyzes your behaviour and proactively puts application into available main memory, so they can be launch quicker. You may have noticed that a greater percentage of RAM tends to be use by Vista than by XP. At first glance you might worried and get nervous by this, but once you consider the impact of SuperFetch this condition becomes less of a concern.

Background tasks - automatic backup programs, antivirus scans and etc - runs when you are not actively using your computer and it will least disturb you. SuperFetch keeps track of which applications you use most and loads faster than they normally would if the hard disk have to be accessed every time by loading it into the RAM. SuperFetch prioritizes the currently used program over the background task. In addition, SuperFetch adapts to your working environment and the way you work by tracking your frequently use programs and pre-load it into your system.

In a nutshell, SuperFetch is another improvements in Vista from its predecessor XP. Hope this article is useful and informative for you.

Command Prompt: The Requested Operation Requires Elevation


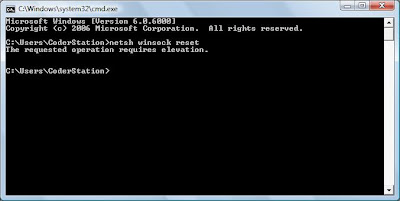
Some of you might have tried to flush and reset a client resolver cache or winsock settings using the ipconfig command in Vista; however an output line like this appear " The requested operation requires elevation". If you ever occur such error all you need to do is elevate your privilege to the system. This means you need to run the Command prompt as an Administrator. If you have Administrator privilege all you need to do is run the command prompt as an administrator.

To run the command prompt as an administrator all you need to do is:
  1. Click Start >> All Programs >> Accessories >> Right-Click on Command Prompt and choose to Run as Administrator.

  2. This will initiate User Account Control(UAC), click Continue to open up the Administrator: Command Prompt. If you arent sign is as administrator you will need to enter administrative password to continue.
Now you can run any command to your heart content. Have fun and have a good day.

Command Prompt

Monday, December 22, 2008

iClebo - Intelligent Cleaning Robot


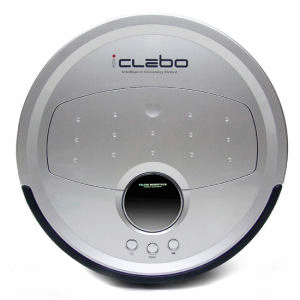
IClebo is an intelligent, convenient, clean & slim auto charging cleaning robot with a suction of 30W/ 70W (Turbo) made by two South Korean firms teamed up, KTF and Yujin Robot. The name iClebo is a short term given for Intelligent Cleaning Robot.

This magnificent robot is powered by a Lithium-ion battery, which means it has no memory effect, long life span, short charge time and a longer use time. When the battery level is low, this clever robot will detect a docking station and charge itself up.

As well as this, iClebo has various infrared sensors in order to avoid collision whilst cleaning. These sensors include:

7IR sensors: To avoid hits and minimize scratch to furniture and wall

Bumper/Touch sensor: To recognise various obstacles

Floor detection sensor: To not fall down stairs

Wheel sensor: Stops operation when the robot is lifted

Not only this, IClebo has 3-level filtering system which consists of a mesh filter, anti-bacterial filter; for the elimination of micro particles, and an electrostatic filter, maximizing the cleanliness on the inside and the outside.

This user convenience gadget comes with a wider and a more convenient digital display where the users can also pre-set the cleaning time by setting the time once. The convenience doesn’t end there, plusa has maximized it with a removable brush/ battery pack design.

Other than that, IClebo also comes with higher suction power of 3 levers; side brush, main brush, and vacuum suction, cleaning even the finest dust. These also results an efficient vacuum suction for collection duct and powered brush for sweeping.

Probably the best thing about this machine is that it makes low noise (60dB), minimizing disturbance and with its slim design, it makes it possible for itself to clean even under beds and sofas. These could help us or children even to concentrate better in their works and studies.

Last but not least, it comes with various cleaning modes, making it possible for us to choose the most efficient cleaning mode, either random,circular, wave, or corner mode, regarding the space, size and shape of the room. With its efficient lithium battery, it allows more area to be cleaned.

For more information on this swell robot, visit:

http://www.kjglobal.co.uk/acatalog/iClebo_cleaning_Robot.html

http://www.ieee-ras.org/uploads/industrial/iera06/shin_short.pdf

And find out how IClebo can operate as a guard dog as well as a housemaid ;)

Creating Restore Point Manually with Vista

Restore points is basically a snapshot of computer system state. Restore point contains information on system registry and other system information that windows uses. Every time user wants to restore their system to the early state before any changes- which may cause the system to be unstable, are made to the system, this restore points will be refer to by the system restore. If you have no clue on what restore point or system restore I suggest you start reading on this article.

Below is a step-by-step instructions on how to create a restore points manually:
  1. Open System Restore. The System Restore tool is accessible by going through Start >> All Programs >> Accessories >> System Tools >> System Restore. Once the system restore screen is shown, click on open System Protection. Below is the opening screen for system restore:

  2. You will be directed to System Protection tab shown below:
    Click on Create button to create a Restore Point.

  3. A pop up asking you to type in the description of your restore point will appear.Type a description for your Restore Point and click on Create button. A restore point will be created after a few minutes.

Sunday, December 21, 2008

Get to know Windows System Tools Part 2 (System Restore)

System Restore is one of many great Windows System Tools which allows you to roll your computer back to the state it was before in the event of system instability. If your computer acts funny after you install any device driver or applications you should opt for the system restore tool. However, the ability of the system restore is limited; it is not capable to get rid of any Malware you got after your restore point. Take note that a restore points need to be created before you want to use the system restore tool.

In this article you will find on what system restore actually is, when to use it and how to actually use this great tool.
  • How System Restore works?
    • System Restore works by referring to the saved state by your computer system. This saved state which save snapshot of the state the computer system is in is called Restore point. Restore points are usually created automatically for the users over time.
  • When the restore points are created?
    1. Upon users request. To learn how to make your own restore points for Vista follow this link.
    2. When new application is installs through Windows Installer.
    3. When the user installs a driver that is not recognize by Windows Operating System.
    4. Every time Windows boots up after turn off for more than 24 hours.
  • When is the best time to create a restore points?
    1. Before installing any new application without the use of Windows Installer(Restore Points will be created automatically when new application is installs through Windows Installer).
  • How to use System Restore?
    • It is easy to use Windows System Restore. Below I will be guiding the users step by step to use system restore on Vista machine. For those who are using Windows XP I suggest to look at this link.
      • The System Restore tool is accessible by going through Start >> All Programs >> Accessories >> System Tools >> System Restore. Below are the opening page for System Restore:

      • Click next and you will be shown a screen where the restore point is listed

      • Click next and you will need to click Finish to confirm your restore point. A pop-up window will appear.

      • Click Yes to continue and voila Windows will start making changes to your System back to the state your computer is in when your restore point is created restore point.
      • *Note that Windows will restart your computer to apply the changes.
System Restore is a great tool to recover your computer system to the way it as once before. If you ever find that your computer performs differently usually after installing application be sure to use system restore to get it back to the good old time.
A word of advice, always create a restore point before you try install any application to your system.

Thursday, December 18, 2008

Get to know Windows System Tools Part 1 (Disk Cleanup)

Over the pass year Microsoft has been providing their users with their own Windows System Tools, but not many of us actually use the System tools such as Disk Cleanup, Disk Defragmenter, System Restore. In this article we will be looking on the Disk Cleanup tool. I'll be covering from what it is and how to use it.
  1. Disk Cleanup.
    • What is Disk Cleanup?
      • The Windows Disk Cleanup is a great tool which help the users in cleaning up their hard disk. Every time the users run this tool it will scan through their hard disk and find any files and and folders which are safe to to be remove. Users will then be able to choose from the list of items show by the tools.
      • Below are what users are able to choose from:*
        • Downloaded Program Files - are ActiveX controls and Java applets downloaded automatically from the Internet when you view certain pages. They are temporarily stored in the Downloaded Program Files folder on your disk.
        • Temporary Internet Files - contains webpages stored on your hard disk.
        • Offline Webpages - webpages that are stored on your computer so you can view them without being connected to the Internet.
        • Hibernation File Cleaner - contains information about the state of your computer as it enters hibernation. This will disable hibernation.
        • Recycle Bin - contains files you have deleted from your computer.
        • Setup Log Files - Files created by Windows.
        • Temporary files - Stores temporary information by various Programs ran.
        • System archived Windows Error Report - Files used for error reporting and solution checking.
    • How to use Disk Cleanup?
      • Using the Disk Cleanup tool is fairly simple, below are the instructions on how to, for both Vista and XP operating System:
        • Click Start >> All Programs >> Accessories >> System Tools >> Disk Cleanup.
Hope you will find this article useful and informative for your PC performance.

Ever miss your good day of surfing and working on your computer smoothly without trouble? In the next article I'll be writing on System Restore. A great tools for all the users to restore their PC to their happy days.
*Description are taken straight from Windows Operating System.

Tuesday, December 16, 2008

Top 5 Annoyances I find in Web Pages

  1. Downloading plug-ins
    This little programs that I have to download to get an audio or video message before I can enter the site - they make me want to go somewhere else!
  2. Bad Design
    • Too many buttons and links on different parts of the page are confusing. Sometimes, I got into the trouble of accidentally clicking on the link that I don't want to.
  3. Pop-up ads
    • The dreadful and annoying advertisement that suddenly appear - it drives me crazy!
  4. Frames
    • I just hate those silly boxes in Web pages. Sometimes the text doesn't fit in the frame and I have to use either the vertical or the horizontal scroll bar. This makes it very hard to read. Don't you just hate it?
  5. Flash
    • These animations are good if they download quickly. However, I encountered many that seems irrelevant to the website and it slow down the time for the web page to open; the only purpose is to make the site look pretty. DUH!

Best Backup Plans

I often wondered, what is the best backup plan to use for my computer? As a good backup plans will allow me to restore my computing environment to its pre-disaster state with a minimum of fuss. Unfortunately, no single backup plans fits everyone's computing style or budget. So, you must devise your own backup plan that's tailored to your particular computing needs. I will just give you the outlines factors you should consider as you formulate your own backup plan.

Here are the checklist:

- Decide of how much of your data you want, need, and can afford to back up.
- Create a realistic schedule for making backups.
- Make sure you have a way to avoid backing up files that contain viruses.
- Find out what kind of boot disks you might need to get your computer up and running after a hard disk failure or boot sector virus attack.
- Make sure you can test your restore procedure so that you can successfully retrieve the data you've backed up.
- Find a safe place to store your backups.
- Decide what kind of storage device you'll use to make backups.
- Select software to handle backup needs.

Using Windows ReadyBoost

This is an elaboration on what I have written before(Article post by Mikenamz, December 15, Fasten Up Your Vista Performance Now!!!). At first I was thinking of editing the present article, but after thinking through about it, i thought why not I make another article explaining on what and how to use the Windows ReadyBoost. Hope this will help the users on understanding this awesome feature.

The Windows ReadyBoost is one of the pros of Windows Vista. It enables you to plug a Universal Serial Bus (USB) flash drive or Secure Digital (SD) memory card into your computer and have Windows Vista have it as memory. This is a benefit for people who is using Vista and wants to improve their PC's memory resources and at the same time wants to reduce the cost needed to upgrade the memory of the PC(Machines upgrade can be difficult and costly, moreover, some machines have limited memory expansions capabilities, making it impossible to add RAM). Windows ReadyBoost allows Windows Vista to service normal disk 80 - 100 times faster than random reads from traditional hard drives. In addition, there are some requirements for a device to be compatible to use the ReadyBoost option.

For a device to be compatible and useful it must conform to the following requirements:
  • The capacity of the removable media must be at least 256 MB (250 after formatting)
  • Devices larger than 4 GB will have only 4 GB used for ReadyBoost
  • The device should have an access time of 1 ms or less
  • The device must be capable of 2.5 MB/s read speeds for 4 KB random reads spread uniformly across the entire device and 1.75 MB/s write speeds for 512 KB random writes spread uniformly across the device
  • The device must have at least 235 MB of free space
  • NTFS, FAT16 and FAT32 are supported (Windows 7 and Vista SP2 will support also the new exFAT filesystem)
  • The initial release of ReadyBoost supports one device. The recommended amount of flash memory to use for Windows ReadyBoost acceleration is one to three times the amount of RAM installed in your computer.


It is easy to use Windows ReadyBoost. You just have to plug in the USB flash drive or SD memory card to your machine first. Then Windows will check if the performance of the device is fast enough to work with Windows ReadyBoost. If the device is fast enough, you will be ask if you want to use the device to spped up our system. Here is a sample window picture of it.


If not, a window like below will appear.


So, in a nutshell, try this yourself and you'll see the benefits of ReadyBoost.

* The Windows ReadyBoost feature is included in Windows Vista edition Home Basic, Home Premium, Business and Ultimate

Monday, December 15, 2008

Fasten Up Your Vista Performance Now!!!

It has been a year since Vista had been released. Now more and more people shifting to Vista. With lots of graphical features available, such as aero transparency, flip 3D it will mostly leads to a performance hit.
If you think that your Vista’s performance lagging, here are some steps you can take to make it faster:
  1. Add more RAM
    • Anyone who have uses Vista knows that Vista is one memory hog operating system. While 1GB of memory looks super on Win XP, it’s the opposite on Win Vista. Forget about the graphical features in Vista, with 1GB you can barely run three applications at one time. If you are still running Vista with 1GB I would suggest you to equip your system with at least 2GB of RAM.
  2. Get a good video card.
    • Today video cards play an important role in influencing the computer performance unlike 5 years ago. With Vista Graphical feature such as Aero, Flip 3D, and many more a good or great video card is needed to run the Vista smoothly. If you are short of budget and did not care much about the entire graphical feature provided by Vista I suggest you turn off all the unneeded graphical features such as Vista Sidebar and Vista Aero (excluding Vista Home Basic Edition).
    • Vista Sidebar is one of the great features that Vista has. Although I said that, it comes of no use if we don’t make use of the applets. If you find that the sidebar is of no use to you, you should turn it off and disable it for good.
      • To turn it off - “right-click” the sidebar >> Close
      • To disable it – “right-click” the sidebar >> Properties >> Uncheck the "Start Sidebar when Windows starts" checkbox.
    • Vista Aero is the feature that provides the users with cool glassy and 3D effect. To those who are struggling with their Vista, it is wise for them to turn it off. The best way to turn off Vista Aero is told below:
      • To turn it off – “right-click” on Computer(My Computer) >> Properties >> Advanced System Settings(on Tasks) >> On Advanced tab click on Perfomance's Settings Button >> On Visual effects tab choose Custom and check any feature you would like to run.
      • If you choose to uncheck all the checkbox don’t be surprise if your window turns much like Windows Classic Themes.
  3. Windows ReadyBoost
    • Ok this is the best way to increase your memory without buying any new RAM. With ReadyBoost, user will be able to increase their memory with their available flash disk. How cool is that. For those user who have limited memory expansion capabilities this will most probably their life savers, but there’s a catch, Vista will first checks on your flash disk to see if its see if its performance is fast enough to work with Windows ReadyBoost. If it doesnt, you won’t be able to improve your memory any time soon.
  4. Stop Unneeded Starts Up Programs
    • Ever wonder why it took so long just to load your operating system? Well it’s mostly related to too many starts up programs running when the operating system starts to load.
  5. Use Windows System Tools.
    • Often most of the users do not know of the Windows System Tools or scared of using it since there are afraid if the disk cleanup or defragmentation will delete their files or change any PC’s configuration.
    • Well that’s easy enough to solve it isn’t it. All you users need to do is understands what the various system tools does. A good reference on defragmentation can be found at this link
    • I’ll explain briefly on what disk cleanup does. Well like the name suggest, the disk cleanup will clean your disk good. But what exactly it cleans? Well for starters it lets you choose from various things such as Recycle Bin, Temporary files, Temporary Internet files, Hibernation Files cleaner, and many other things that will be opt to you.
    • By doing both disk cleanup and defragmentation on a system which you have never defrag or cleanup, you’ll be surprise with how much your system will improves.
    • I’ll be posting an article on the various system tools later in another article. So hope all of you be waiting for it.
Hope your Vista will give you better performance by following this short guide. Hope this will help.

Wednesday, December 3, 2008

Enter Windows 7

It has been nearly two years since the release of Windows latest OS, Vista. Now comes a new Microsoft Windows, enter Windows 7. Microsoft produce this OS for use on personal computers, including home and business desktops, laptops, Tablet PCs and media center PCs. Windows 7 is build based on the Windows Vista. Some said that it is the savior of the struggled Vista and others, another disaster. No matter what the small percentage of users said, there are no doubt many new, noticeable, and great feature. Below I listed 5 great features which are worth to mention here:
  1. UAC's Great Improvement
    • Finally, what users have been waiting for, a UAC(User Account Control) which you can fully control. For those who are new to the term, UAC is (taken straight from Wikipedia.com) a technology and security infrastructure introduced with Microsoft's Windows Vista Operating System. It aims to improve the security of Microsoft Windows by limiting application software to standard user privileges until an administrator authorizes an increase in privilege level. In Vista you either turn it off or let it bother you everytime you are opening an apllication. Now with Windows 7, you are given four choices, these are, never notify, only notify me when programs try to make changes to my computer, always notify me, and always notify me and wait for my response. With these option users can control the UAC further.
  2. A Better Taskbar
    • Even though it does not come with the pre-beta, it is still one of the most talked about feature in Windows 7. This is due to the to its beautiful made taskbar that look a lot like the Mac OS X dock. Another feature of the taskbar is it is able to show all the running programs in a thumbnail list and if you hover over one of the thumbnail a window representing the program will appear. If you hover in one of the window the other window will become transparent thus the window you selected will be fully reveal.
    • You can watch the demo by following this link. This is by no means my video. Im only providing the link to the video.
  3. Easy Networking
    • It is now easy to set up a group of networking inside your house. Now you can share pictures, music, videos, documents and devices such as a printer easily. This is great especially for home users who find it difficult in configuring their own home network. This networking feature is called Homegroup, now even a total novice can set up their own home network.
  4. Libraries
    • The name says it all, with Libraries, Windows 7 will sort all your files into their own specific folders depending on their content. Instead of trashing all of the files in the Document file like before, Windows 7 keep all of the files in a specific folder according to their content's type.
  5. Enter Touch-Screen
    • Finally here comes an OS build with touch-screen capability for the Personal Computer's user. Not only that it is touch-screen but it also is a multi-touch screen, this means that the screen may work even with multi touch.
    • For a demo on this feature you may watch it here. Again this is not my video, I am merely providing the link to the video.
Windows 7 are said to be release on 2010. So let us pray that it wont be a disappointment like Vista to all of the users. I wish the Windows 7 project a good luck.